

Cabinet Painting Mistakes (And How to Avoid)
It feels good to paint cabinets. A little paint and a little time, and your kitchen is new. But there's a catch: a tiny error may wreck the whole appearance.
A lot of homeowners had to learn this the hard way.
So before you pick up that brush, let’s go step by step and understand the most common Cabinet Painting Mistakes with simple fixes you can follow easily.
Why Cabinet Painting Needs Extra Care?
Painting your cabinets is a whole different beast than rolling paint onto your walls. Think about it: your walls just sit there, but your cabinets are working hard every single day. They’re constantly battling kitchen heat, cooking grease, and the inevitable wear and tear from everyone grabbing the handles.
Because they take such a beating, even minor Kitchen Cabinets Painting Mistakes can quickly turn your project sour. You might end up with:
Peeling paint that chips away way too soon.
Sticky surfaces that feel tacky even weeks later.
An uneven finish that looks blotchy under your kitchen lights.
It’s a lot like cooking rice if your ratios are off or the heat isn’t quite right, the whole batch ends up ruined. Getting it right takes a little more patience and the right approach from the start.
Transform your kitchen in days, not weeks. Get a free quote from Barnett Cabinet Painting & Refacing.
5 Mistakes When Painting Kitchen Cabinets (And Their Fixes)
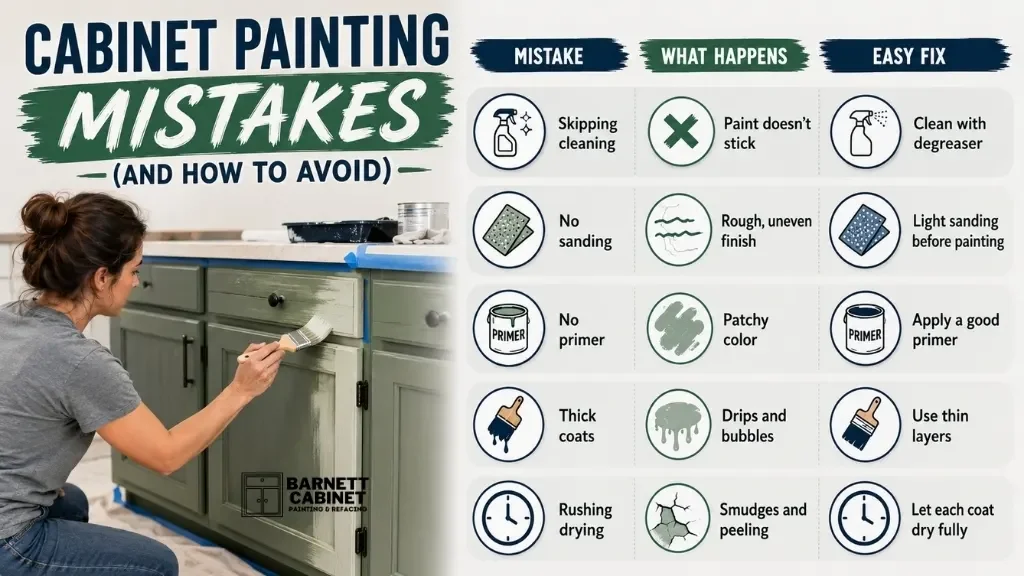
| Mistake | What Happens | Easy Fix |
|---|---|---|
| Skipping cleaning | Paint doesn’t stick | Clean with degreaser |
| No sanding | Rough, uneven finish | Light sanding before painting |
| No primer | Patchy color | Apply a good primer |
| Thick coats | Drips and bubbles | Use thin layers |
| Rushing drying | Smudges and peeling | Let each coat dry fully |
These are the most common mistakes made in painting kitchen cabinets and luckily, they’re easy to fix if you know them early.
Avoid these mistakes before they cost you time and money. If you want a smooth, long-lasting finish without stress, let our experts team handle your cabinet painting the right way from day one.
Surface Preparation Mistakes (Where Most People Go Wrong)
Not Cleaning Cabinets Properly? Let’s be real: this is arguably one of the biggest Kitchen Cabinets Painting Mistakes you can make. Even if your cabinets look perfectly clean to the naked eye, they’ve spent years absorbing microscopic layers of cooking grease and steam. If you paint right over that film, you’re basically just painting on a layer of oil.
What happens if you skip the prep:
Paint slides off: Without a clean surface to bite into, the paint won't bond.
Surface becomes uneven: Dirt and grease trapped under the finish create a textured, bumpy look.
Finish doesn’t last: Your hard work will start peeling or flaking within months.
How to handle it the right way:
Use a high-quality degreaser: Don't just reach for standard soap; use a dedicated degreaser designed to cut through kitchen grime.
Wipe every single corner: Pay close attention to the grooves, edges, and areas near the stove where buildup is heaviest.
Let it dry completely: Even a tiny bit of trapped moisture can ruin your finish. Be patient and give it plenty of time.
This is one of the key things to avoid when painting kitchen cabinets.
Skipping Sanding
A lot of DIYers look at the sanding step and think, "Can I just skip this?" The short answer is no. Skipping this part is a recipe for long-term frustration.
Think of your cabinet surface like a smooth, sealed envelope—paint just slides right off it. If you don't rough it up a little, the finish has nothing to latch onto, and you’ll start seeing chips and scratches almost immediately after you finish.
What happens if you skip it:
Paint won’t grip: The lack of "tooth" means the paint will never truly bond to the wood.
Cabinets chip easily: Even a light bump with a pan or a fingernail can leave a permanent mark in your new finish.
The easy fix: You don't need to spend hours sanding your cabinets down to the raw wood. A light, thorough sanding is usually plenty to help the primer do its job. Just focus on dulling the existing finish so your new coats have something to hold onto.
This is a classic case of how not to paint cabinets.
Paint Application Mistakes That Ruin the Finish
Using the Wrong Paint
If you’re asking, “Is it a mistake to paint cabinets with wall paint?” Yes it is.
Cabinets need strong, durable paint.
| Paint Type | Good or Bad | Why |
|---|---|---|
| Wall paint | Bad | Not durable |
| Acrylic enamel | Good | Smooth and long-lasting |
| Cabinet paint | Best | Designed for heavy use |
Putting on thick coats
You might assume that putting on a thick, heavy layer of paint will save you time and give you greater coverage, but this is one of the worst things you can do when painting kitchen cabinets. If you put on too much paint at once, it won't dry evenly, and the surface will seem sloppy, which is not what you want.
What happens when you put on too much:
Drips: You'll get those irritating, hard paint "tears" running down the front of your cabinets.
Bubbles: The top layer dries too quickly, which keeps moisture trapped beneath and produces little, ugly air pockets.
Uneven finish: The paint will settle in strange areas and ridges instead of giving the surface a smooth, factory-like look.
The best method to accomplish it is:
Use thin coats and think of it as a marathon, not a sprint.
Put on thin, uniform layers using your brush or roller.
Take your time building layers.
Three thin coatings that look great are better than one heavy coat that gets lumpy and peels easily.
This is one of the worst things you can do while painting cabinets.
Ignoring Primer
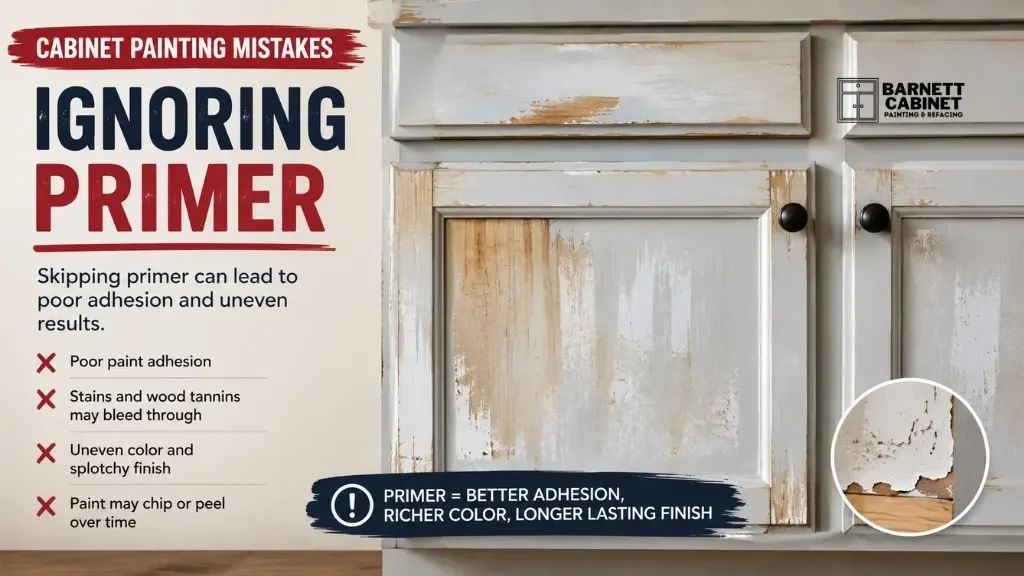
Think of primer as the foundation of a house. You wouldn’t build your dream home on shifting sand, and you shouldn’t put expensive paint on a surface that isn't ready for it. Primer acts as the "glue" that bridges the gap between the cabinet material and your topcoat.
What happens without it:
Paint looks dull: Without a base, the wood or old finish absorbs the paint unevenly, leaving you with a flat, lifeless look.
Stains come through: Wood tannins, old grease, or dark colors will eventually bleed through your fresh paint, creating ugly yellow or dark spots.
Finish becomes patchy: You’ll see areas that look shiny next to areas that look matte, making the whole project look unprofessional.
The best approach: Never skip this step. Always use a high-quality primer it’s absolutely essential when you're dealing with raw wood or trying to cover up dark, dated cabinets. It seals the surface and ensures your final color looks exactly how it did on the swatch.
This is one of the most serious cabinet painting common mistakes.
Cabinet Door Paint Mistakes You Should Never Ignore
Painting Without Removing Doors
It’s incredibly tempting to keep the doors on their hinges to save time, but trying to paint everything in place usually backfires. While it feels faster in the moment, it almost always leads to a messy finish that you’ll have to fix later.
Common cabinet door paint mistakes include:
Uneven edges: It’s nearly impossible to get a clean, smooth stroke around the hinges and the sides of the frames while they’re hanging.
Paint drips: Gravity is not your friend here; excess paint will pool in the corners or sag down the front of the doors.
Missed spots: You’re bound to miss those tiny gaps and hard-to-reach crevices where the door meets the cabinet box.
A better approach:
Remove the doors: Laying them flat allows the paint to level out naturally, giving you a much smoother, professional look.
Take off all handles and hardware: Don't try to paint around them you'll end up with "halos" or paint on your metal fixtures.
Label every part: Use a bit of painter's tape to mark which door goes where. You’ll be very glad you did when it’s time for the easy setup at the end!
Rushing the Drying Process
This is where many people lose patience, but rushing is risky. Even if the surface feels dry, the paint underneath needs time to truly harden.
The risks of moving too fast:
Smudges: Handling doors too soon leaves permanent fingerprints.
Sticking: Hanging doors early can cause them to glue shut against the frames.
Peeling: A second coat applied too quickly can pull up the first layer.
| Action | Result |
|---|---|
| Touching early | Finger marks |
| Recoating too soon | Peeling |
| Closing doors quickly | Sticking |
White Cabinet Paint Mistakes (Looks Easy, But Isn’t)
White cabinets are the gold standard for a clean, modern kitchen, but they are also the most unforgiving. Because white reflects so much light, every tiny bump, hair, or stroke mark stands out like a sore thumb.
White Cabinet Paint Mistakes
White cabinets are the gold standard for a clean, modern kitchen, but they are also the most unforgiving. Because white reflects so much light, every tiny bump, hair, or stroke mark stands out like a sore thumb.
Brush marks become visible: Without the right technique, white paint can look streaky and DIY-ish rather than smooth and factory-finished.
Yellowing over time: Certain oil-based paints or cheap finishes can take on a dingy, yellowish tint after a few years, especially in sunny kitchens.
Dirt stands out quickly: Every smudge, coffee splash, and fingerprint is immediately visible against a bright white backdrop.
The Solution:
Use high-quality paint: Investing in a premium cabinet-grade paint makes a world of difference in how the color levels out.
Apply evenly with good tools: Using a high-quality microfiber roller or a high-end brush helps minimize those annoying texture lines.
Choose non-yellowing formulas: Look for water-borne alkyds or high-performance acrylics that are specifically designed to stay crisp and bright for the long haul.
These are typical white cabinet paint mistakes people regret later.
Tools and Finishing Mistakes
Beyond just the brushes, your choice of materials and the environment you work in can make or break the final look. If you use a standard wall paint instead of a dedicated cabinet enamel, the surface will stay soft and vulnerable to scratches.
Using Cheap Brushes and Rollers
| Tool Quality | Result |
|---|---|
| Cheap tools | Streaks and lint |
| Good tools | Smooth finish |
Investing in tools helps you avoid mistakes to avoid when painting cabinets.
Skipping the Top Coat
After hours of cleaning, sanding, and painting, many people are so relieved to be finished that they stop right after the final color coat. However, calling it quits too early is a major mistake that can cut the life of your project in half.
Why leaving them unsealed is risky:
Paint chips easily: Without a protective shield, your new paint is vulnerable to every bumped pot and stray utensil.
Cabinets wear out faster: The constant cleaning and moisture in a kitchen will eventually break down the paint, causing it to dull or flake away much sooner than it should.
The Fix:
Apply a protective topcoat: Think of this as the "clear coat" on a car. Adding a durable, high-quality sealer ensures your cabinets can handle the daily chaos of a busy kitchen.
Long-lasting results: Taking this extra step locks in the color and gives you a finish that stays looking fresh and professional for years to come.
What Not To Do When Painting Cabinets
| What Not To Do | Why It’s a Problem |
|---|---|
| Skip cleaning | Paint won’t stick |
| Avoid sanding | Surface becomes rough |
| Use wrong paint | Poor durability |
| Apply thick coats | Drips and bubbles |
| Rush drying | Smudges and peeling |
| Ignore primer | Uneven color |
| Skip sealing | Short lifespan |
Final Thoughts
Painting cabinets can feel like a quick makeover, but it’s really a step-by-step process where every small detail matters. The truth is, most Cabinet Painting Mistakes happen when people rush or skip the basics. From poor cleaning to using the wrong paint, these simple errors can turn a good idea into a disappointing result. But when you take your time, follow the right steps, and avoid common traps, the outcome can look smooth, fresh, and long-lasting just like a professionally done kitchen.
At the end of the day, success comes down to patience and smart choices. If you remember what NOT to do when painting cabinets and stay careful during each stage, you’ll save yourself from costly fixes later. Think of it like building something strong you need a solid base first. So go slow, use the right tools, and focus on quality over speed. That’s how you turn simple paint into a kitchen upgrade you’ll be proud of.
“Ready to give your kitchen a fresh new look without the risk of costly mistakes? Contact us today and get professional cabinet painting that lasts for years.”
FAQs
-
No, it’s not a mistake if done correctly. But skipping prep work like cleaning, sanding, or priming can lead to poor results and make it feel like a bad decision.
-
The most common mistakes when painting kitchen cabinets include not cleaning properly, skipping sanding, using the wrong paint, and rushing drying time.
-
To avoid common mistakes when painting cabinets, take time to prepare surfaces, use primer, apply thin coats, and let each layer dry fully before moving on.
-
Do not paint over dirty surfaces, skip primer, use cheap tools, or apply thick coats. These mistakes can ruin the finish and reduce durability.
-
Paint usually peels or chips when cabinets are not cleaned or sanded properly. Lack of primer and poor-quality paint can also cause this issue.
-
Yes, white cabinet paint mistakes are very common because white paint shows brush marks, stains, and yellowing more easily if not applied properly.