

Cabinet Painting Process: A Complete Step-by-Step Guide to Achieve a Professional Finish
You don't always need to tear out your entire kitchen to make it feel brand new. In many cases, the "bones" of your cabinets are still perfectly strong, even if their appearance feels stuck in another decade. This is exactly where understanding the kitchen cabinet painting process becomes your most valuable tool. When done right, it’s the most effective way to transform your space without the massive price tag of a full replacement.
However, many homeowners fall into the same trap: they fall in love with a paint color but completely ignore the kitchen cabinet painting process. The reality is simple even the most expensive, high-end paint will eventually fail if the correct kitchen cabinet painting process isn't followed from day one.
This guide breaks down the full kitchen cabinet painting process in a way that’s clear, practical, and easy to follow. Whether you’re gearing up for a DIY weekend or weighing the benefits of a professional kitchen cabinet painting process, this article will help you master the steps, the timeline, and the best approach for a flawless finish.
What Is The Cabinet Painting Process?
Think of repainting your kitchen cabinets less like a "quick weekend craft" and more like a professional restoration. If you just slap a coat of paint over old grease or a glossy finish, it’s going to peel or chip before the month is out.
To get that factory-smooth look that actually lasts, you have to respect the prep work. Here is how the pros break it down:
The Deep Clean: You can’t paint over kitchen grime. Every surface needs to be degreased so the new finish has a clean canvas to stick to.
The Scuff & Prep: A light sanding is crucial. It’s not about removing the wood; it’s about "opening up" the surface so the primer has something to grab onto.
The Foundation (Primer): This is the secret sauce. A high-quality primer blocks stains and creates a chemical bond between the old wood and the new colour.
The Main Event: Instead of one thick, gloopy layer, applying multiple thin coats of specialised cabinet paint ensures a levelled, brush-stroke-free finish.
The Wait: This is the hardest part. You have to let the paint cure, which means letting it harden completely before you start slamming doors or installing hardware.
It takes a bit more patience, but following these steps is the difference between cabinets that look "painted" and cabinets that look brand new.
Want painting or refacing of your kitchen, or any space? If yes, Barnett Cabinet Painting & Refacing can help you to make your space more aesthetic and good.
Why The Right Cabinet Painting Procedure Matters?
When homeowners ask, What is the process of painting kitchen cabinets? The answer really comes down to the discipline of the preparation. It’s a project where the "invisible" work – the cleaning, sanding, and priming – actually does most of the heavy lifting for the final look.
If you skip steps or rush the cabinet painting procedure, the consequences usually show up pretty quickly:
Premature Peeling: Paint that lifts or chips away within just a few months.
A Rough Texture: An uneven finish that feels gritty to the touch.
Poor Longevity: Surfaces that can't handle the heat, steam, and oils of a working kitchen.
On the flip side, the secret to achieving that showroom-quality appearance lies in perfecting the cabinet painting technique. This ensures the paint adheres properly, resulting in a smooth, even finish that exudes quality. Furthermore, it provides the necessary resilience to withstand everyday moisture and the rigours of use.
Think of it like laying floor tiles: if the subfloor is uneven, the tiles will eventually crack. The same logic applies here: a flawless finish is only as good as the foundation beneath it.
Recommended Read: Cabinet Painting Mistakes (And How to Avoid)
Cabinet Painting Process Step by Step
To get that high-end, factory-quality look, you really have to respect the cabinet painting process step by step. It’s not just a set of chores; each stage plays a critical role in how the final product feels and functions.
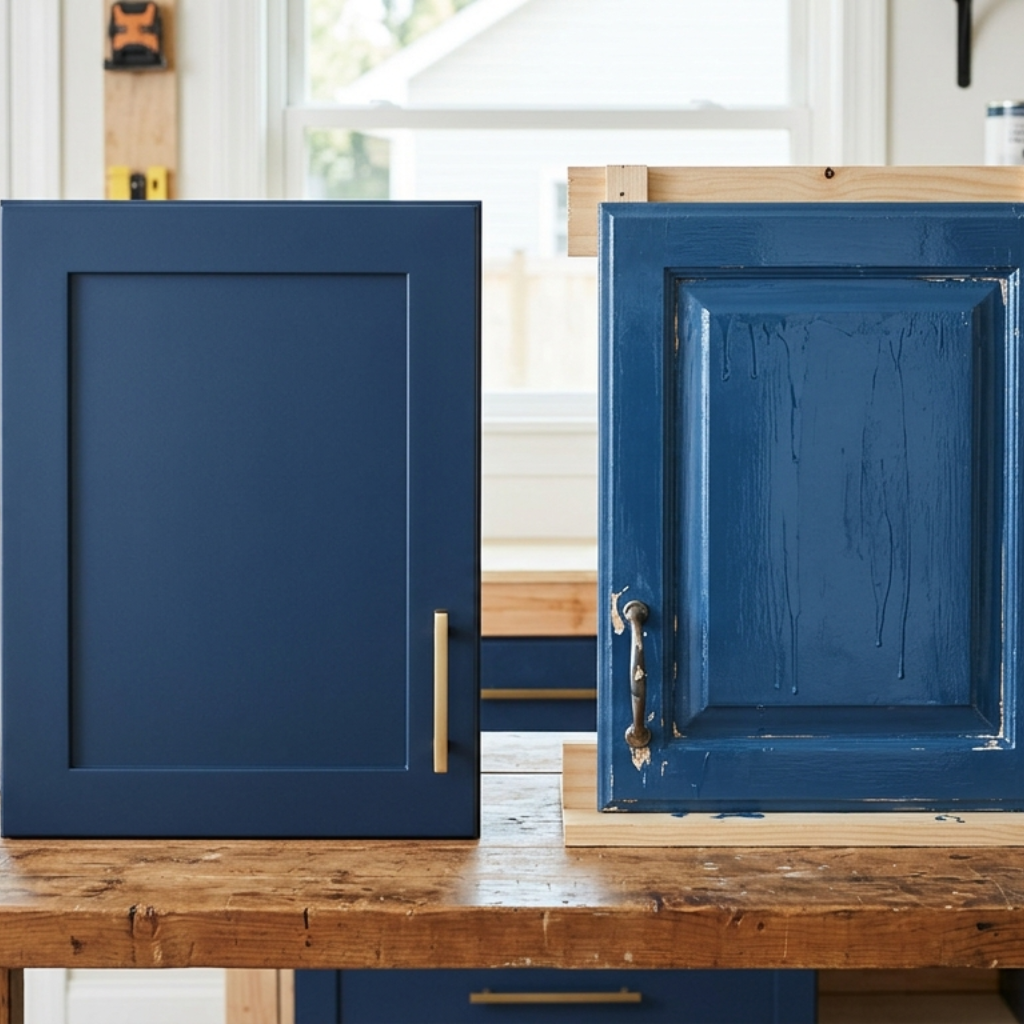
Step 1: Removing doors and Hardware
Starting with a clean slate is the most important part of the steps to paint kitchen cabinets. It begins with the complete disassembly of the unit, removing every door, drawer front, handle, and hinge.
While it’s tempting to try to paint around the hardware, taking the time to strip everything down offers three major benefits:
Total Surface Access: You can reach the edges and corners of the frames that are normally hidden, ensuring no old wood peeks through.
Cleaner Hardware: It’s the only way to prevent "paint bridge"where paint dries between the wood and the metal, causing ugly peeling or sticking later on.
A Professional Texture: Laying the doors flat on a workbench allows the paint to level out naturally, giving you a smooth, even application without those annoying vertical drips.
It definitely adds some labor up front, but it’s the difference between a DIY project that looks "homemade" and a professional-grade restoration that stands the test of time.
If you want to DIY your space, Barnett’s DIY Cabinet Painting will be the best option for you.
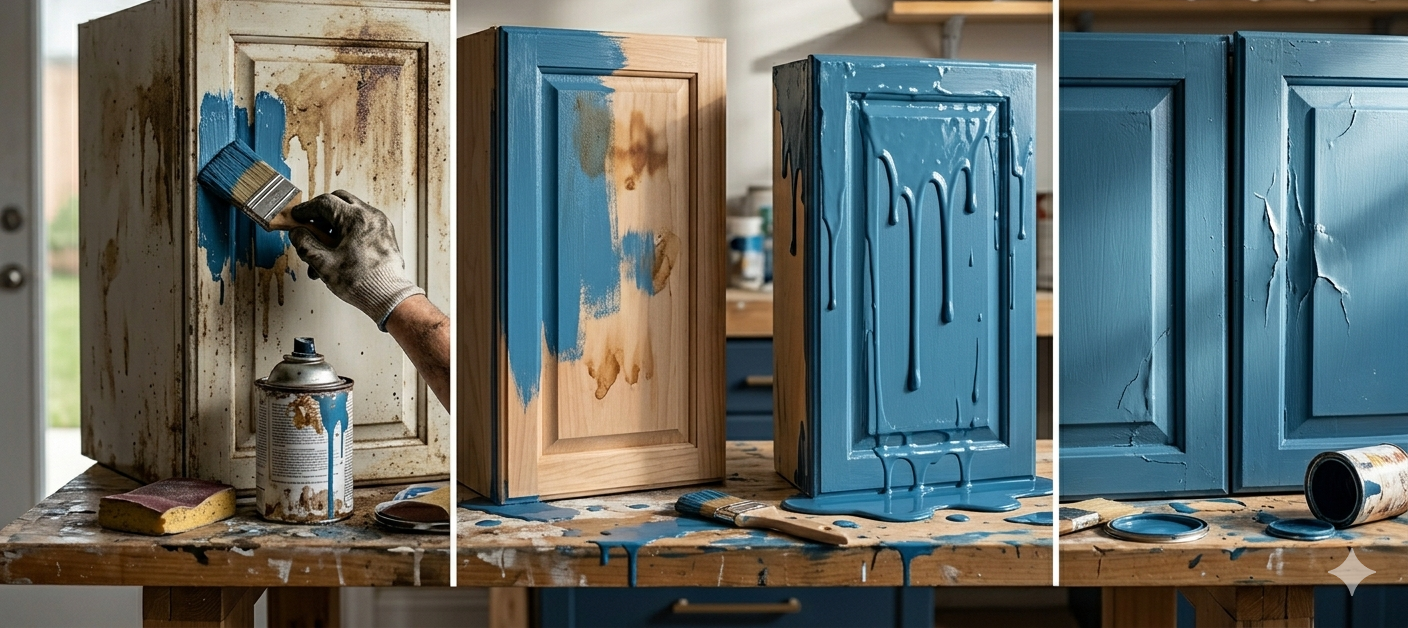
Step 2: Cleaning the Cabinets
In the world of home renovation, a thorough cleaning is arguably the most critical stage in the kitchen cabinet painting process. Kitchens are high-traffic zones, and over time, cabinets become magnets for:
Stubborn Grease Buildup: Fine oils from cooking that settle on every surface.
Dust and Dirt: Which can create a gritty, sandpaper-like texture under new paint.
Invisible Cooking Residue: Steam and food particles that create a slick film.
To tackle this, a professional-grade degreasing solution is a must. If you skip this deep-clean, the paint is essentially trying to bond to a layer of oil rather than the wood itself, leading to weak adhesion and inevitable peeling. Taking the time to strip away the grime ensures your new finish has a perfectly clean "anchor" to hold onto for years.
Step 3: Sanding the Surface:
Sanding is a cornerstone of any professional cabinet painting process technique. It’s not about stripping the wood down to nothing; it’s about "scuffing" the surface to kill the gloss and create a microscopic texture that the new finish can actually grab onto.
When you take the time to sand properly, you’re gaining three major advantages:
Superior Paint Bonding: It gives the primer a "mechanical key" to lock into, preventing peeling later on.
A Flawless Surface: It levels out those tiny nicks, scratches, and imperfections that would otherwise be magnified by a fresh coat of paint.
A Clean Slate: It effectively removes old, failing coatings that might react poorly with your new materials.
For most modern cabinets, you don't need heavy machinery a light and even hand-sanding is usually all it takes to transform a slick, repellent surface into a paint-ready canvas.
Recommended Read: Can You Refinish Oak Cabinets?
Step 4: Repairing Surface Damage:
Before you even reach for the primer, take a moment to closely inspect every inch of the wood for cracks, deep dents, or old screw holes. This "search and rescue" mission is what separates a DIY job from a professional-grade cabinet painting process method.
By identifying and filling these minor flaws early on, you’re guaranteeing:
A Mirror-Smooth Finish: Once the paint dries, every tiny nick acts like a shadow. Filling them now keeps the surface perfectly flat.
Uniform Paint Consistency: Large holes can "soak up" paint differently than the rest of the wood, leading to dull spots or uneven color.
That High-End, Factory Look: When the light hits your finished cabinets, you want to see a seamless surface, not the history of every bump and scrape the kitchen has ever endured.
Whether you're a weekend warrior or a pro, skipping this step is a recipe for regret. A little wood filler and a putty knife now save you from a "patchy" look later.
Step 5: Applying Primer:
Consider the primer to be the essential starting point for the full cabinet painting procedure. It serves as a link between your new color and the old wood, and without it, even the most costly paint would work poorly.
By taking the time to prime, you’re checking three critical boxes:
Superior Adhesion: It creates a "sticky" surface that prevents the paint from simply sitting on top and eventually peeling off.
Stain Blocking: It acts as a seal, stopping old wood tannins, grease, or ink from bleeding through and ruining your fresh finish.
A Uniform Colour Base: It neutralizes the original wood color so your new paint looks rich and consistent from the very first coat.
Skipping this step is the fastest way to end up with patchy colors and a finish that chips at the slightest bump. That’s exactly why high-quality priming is a non-negotiable part of the best process for painting kitchen cabinets.
Step 6: Painting the cabinets:
This is the moment everyone waits for the most visible part of the painting cabinets process. But even though it's where the color comes to life, the final look depends entirely on the hard work you did in the earlier stages.
To get that sleek, professional result, there are a few "golden rules" of application:
Invest in Quality: Using a high-grade, specialized cabinet paint makes a world of difference in how the finish levels out and resists everyday kitchen grease.
The "Thin is In" Rule: It’s tempting to glob it on to get it done faster, but applying thin and even coats is the only way to avoid drips and visible brush marks.
The Patience Factor: You have to give the paint its full "dry time" between layers. Rushing this can trap moisture and lead to a tacky, soft finish.
By building up the color with multiple thin coats, you’re creating a much tougher, smoother, and more durable surface than one thick layer could ever provide.
Step 7: Drying and Curing
This is the final test of patience in the kitchen cabinet repaint process, but it’s arguably the most important. There is a huge difference between paint that is merely "dry" and paint that has actually "cured" and knowing that difference is what keeps your cabinets looking new for years.
Here is how to break down these two critical stages:
Drying: This is the surface-level phase where the paint becomes touch-dry. It looks finished, but the bond is still delicate.
Curing: This is the deep-level chemical process where the paint fully hardens. It’s the transition from a soft film to a tough, protective shell.
By giving your cabinets the proper time to cure, you’re drastically increasing their durability and resistance to scratches. It means that when life happens a slipped plate or a bumping pot your new finish is strong enough to handle the impact without chipping.
Step 8: Reassembling the Cabinets
The final step in the steps to paint kitchen cabinets is the careful reassembly of every component you tucked away at the start.
This includes:
Doors and drawers
Hinges and handles
Alignment adjustments
Once those last screws are tightened, your kitchen instantly regains its full function and visual appeal. It’s the rewarding moment where all that preparation finally transforms into a space that looks and feels brand new.
Recommended Read: How Long Does Cabinet Paint Last?
Overview of Cabinet Painting Steps and Purpose
| Step | Process Stage | Purpose |
|---|---|---|
| 1 | Removing hardware | Ensures clean and even painting |
| 2 | Cleaning | Removes grease and improves adhesion |
| 3 | Sanding | Prepares the surface for paint bonding |
| 4 | Repairing | Fixes dents and imperfections |
| 5 | Priming | Creates a strong base for paint |
| 6 | Painting | Adds Color and finish |
| 7 | Drying & Curing | Strengthens durability |
| 8 | Reassembly | Restores cabinet functionality |
This table gives a simple view of the cabinet painting process step by step.
Best Process for Painting Kitchen Cabinets
In the end, the ideal way to paint kitchen cabinets comes down to three things: careful planning, the correct tools, and a lot of patience. You really get out what you put in with this project.
These are the things you can't change if you want those high-end results:
Foundation First: Cleaning and sanding well aren't simply "extra steps"; they're the only method to be sure your paint doesn't peel in six months.
Quality in, quality out. The primers and paints you pick may make a big difference between a DIY job and a finish that looks like it came from a showroom. It's important to use high-quality materials that are made only for cabinets.
Being exact is important. Using regulated application methods, including applying thin, even layers, makes sure that the finish is smooth and doesn't drop.
The Waiting Game: Letting the paint dry and cure for long enough makes sure the surface is strong enough to handle the bumps and spills that happen in a busy kitchen.
The quickest way to get a messy, short-lived result is to hurry the process. But if you take the time to do it well, you're not simply altering the color of your kitchen; you're making sure that it will last and look great for years to come.
Get a smooth, long-lasting cabinet finish request your free quote today.
Kitchen Cabinet Painting Process Duration
Understanding the kitchen cabinet painting process duration helps in planning your project effectively.
| Process Type | Estimated Time | Key Factors |
|---|---|---|
| DIY Process | 3-7 Days | Skill level, drying time |
| Professional Process | 2-5 Days | Tools, Team efficiency |
| Full Curing Time | 2-3 weeks | Paint type, environment |
The duration depends on:
Kitchen Size
Number of cabinets
Weather Conditions
Experience level
Even if the cabinets look ready, allowing full curing improves durability.
Common Mistakes in the Cabinet Paint Process
Taking shortcuts in the cabinet paint process is the fastest way to ruin a high-end remodel and make it a painful DIY flop. These flaws don't simply make the kitchen seem bad on the first day; they also make the finish last a lot less long.
Watch out for these typical mistakes to keep your project on track:
The Shortcut: If you don't clean or sand first, your paint will stick to old grease and shine, which will make it peel.
The Primer-Free Gamble: If you don't use a special primer, your cabinets might get stains that bleed through and colors that aren't as deep.
The One-Coat Myth: It may seem that putting on large coats of paint is faster, but it nearly always leaves unattractive drips, sags, and a gloss that never completely hardens.
The Rushed Timeline: If you don't pay attention to how long it takes for the paint to dry and cure, your doors will frequently be tacky, meaning they will stick to the frames or smear when you touch them.
The Hidden Flaws: If you don't fix dents or cracks in the surface, the light will make those flaws stand out even more when it strikes the new paint.
Recommended Read: Best Paint For Cabinets: Complete Guide for a Smooth Finish
By avoiding these mistakes on purpose, you're not just painting; you're making sure that the finished product is professional quality and can endure the heat and bustle of a busy kitchen.
Practical Tips for a Better Cabinet Painting Process
To really elevate the final result, it helps to look at the "pro secrets" that turn a standard project into a showroom finish. These small adjustments in your kitchen cabinet painting process make a world of difference in how smooth and professional the cabinets feel under your fingertips.
To get that flawless look, keep these tips in mind:
The Clean Room Approach: Aim to work in a dust-free environment. Even a tiny speck of dust landing on wet paint can create a noticeable bump once it dries.
Invest in the Best: Using high-quality tools and materials like a top-tier synthetic brush or a specialised cabinet roller is the only way to avoid those annoying brush marks and shedding bristles.
Thin is win: always apply paint in thin layers. It might take an extra coat, but it’s the only way to get a durable, factory-smooth surface without drips.
The Organisation Hack: Don't forget to label cabinet parts during removal. A small piece of painter's tape with a number inside the hinge cup ensures every door goes back exactly where it fits best.
Respect the Clock: Allow proper drying and curing time. Giving the paint its full window to harden means you won't have to worry about fingerprints or "sticking" doors later on.
Incorporating these small improvements can significantly enhance your kitchen cabinet painting process, turning a simple colour change into a high-end restoration.
Final Thoughts on Cabinet Paint Process:
The cabinet painting process is easily one of the most practical and cost-effective ways to give your kitchen a high-end upgrade without the massive price tag of a full remodel. However, the real secret to a "magazine-ready" transformation lies entirely in your commitment to the correct cabinet painting procedure.
It’s helpful to remember that every single stage from that first deep clean to the final patient wait for the cure serves a specific purpose. Whether you decide to take this on as a DIY weekend project or hire a professional cabinet painting process team, your consistency and attention to the small details will be what people notice when they walk into the room.
In simple terms, a well-executed process is the only bridge between a "painted" kitchen and a finish that is smooth, durable, and truly professional.
Transform your kitchen today contact us now for professional cabinet painting.
Frequently Asked Questions
-
It includes cleaning, sanding, priming, painting, and curing for a durable finish.
-
It usually takes 2 to 7 days, with additional time for full curing.
-
The best process includes proper preparation, thin paint coats, and sufficient drying time.
-
Yes, but it requires time, proper tools, and careful execution for good results.